
This is typically dependent on the size of door, and the type of application the door will be going into.
Snap a photo of your door and send it to us, or share your house or shop plans—our team will quickly identify the door type and provide recommendations tailored to your needs.
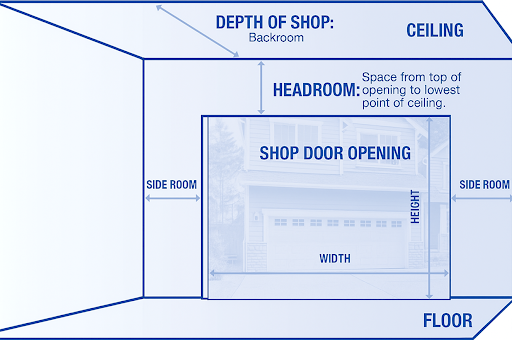
PERFORM ALL MEASUREMENTS IN FEET & INCHES.
1. Measure the Opening Width X Opening Height. Your finished opening needs to be the same size as the door.
2. Measure your Headroom. Headroom is the space above the door opening to the finished ceiling, or the nearest obstruction immediately above the door.
If your headroom exceeds 36” you may want to consider the option of highlift hardware upgrade, which allows the door to go higher up the wall before turning.
3. Measure your Sideroom. This is the space beside the door opening, not including the 2×6 perimeter framing.
4. Measure your Backroom. Backroom is the distance required from the garage door opening toward the back wall of the garage.
5. Request a Framing & Wiring diagram, for the site requirements.
Request Framing & Wiring Diagram
6. Not sure about your measurements?
Send us your house plans, or book a free sitecheck. Please Note: For jobsites located outside the 15 km radius of Grande Prairie, AB, site visits will need to be scheduled with other work in the area.
Commercial Overhead Door – Commercial, Industrial, Warehouse, Shop & Agricultural Applications
PERFORM ALL MEASUREMENTS IN FEET & INCHES.
1. Measure the Opening Width X Opening Height.
The finished Opening Width – Clopay & Richards-Wilcox commercial overhead doors will have a 1” overlap on each side of the opening, unless otherwise stated on your proposal/workorder. Example: If your door is 12’2” wide then your opening needs to be framed to 12’ wide. *Other door manufacturers may not have a 1” overlap, check your proposal/workorder confirmation, or consult with your salesperson for more details.*
2. Measure your Headroom. Headroom is the space above the door opening to the finished ceiling, or the nearest obstruction immediately above the door.
The below chart explains the minimum headroom required based on STANDARD lift hardware, single shaft:
Headroom Requirements: | |||
Door Height | 2” Standard Track – 12”R | 2” Standard Track – 15”R | 3” Standard Track |
Up to 14’h | 14-1/2” | 16” | 18” |
14’3”h to 18’h | Not Available | Not Available | 18” |
Over 19’h | Not Available | Not Available | 21” |
3. Measure your Side Room. Side Room is the space beside your door, not including the 2×6 framing.
There should be no obstructions within this space (from floor to top of framing); such as pony walls, beams, heaters, shelves, etc. which may impede the path of the door and tracks.
With Commercial – Side Room Requirements are based on the type of operation chosen | |||||
Manual Operation (No Chain Hoist or Operator) | Chain Hoist | ||||
2” Hardware | 3” Hardware | 12” | |||
4-1/2” | 5-1/2” | ||||
Electric Operator (Based on Type) | |||||
MH Operator | BH or RBH Operator | CRBH Operator | GH Operator | ||
17” | 18” | 20” | 18” | ||
4. Measure your Backroom. Backroom is the distance required from the overhead door opening toward the back wall of the shop/garage/barn.
Important Note: The above measurements for headroom, sidemount & backroom are general requirements.
Additional room may be required depending on the door thickness, door type, door width/height, etc. Doors over 18′ high, over 1,000 lbs. [454 kg] springing weight or high cycle springs may require additional headroom and sideroom. Consult your salesperson and ask for a shop drawing with the exact requirements.
**Doors with duplex shafts which have more than one row of springs will require additional headroom.
5. Request a Framing & Wiring Diagram, Shop Drawing, and any other site-specific requirements.
Request Commercial Framing & Wiring Diagram
6. Not sure about your measurements?
Send us a copy of your shop drawings, or book a free sitecheck. We offer free on-site consultations. Please Note: For jobsites located outside of the 15 km radius of Grande Prairie, AB, will need to be scheduled with other work in the area.
To help us provide an accurate quote for a replacement door section (sometimes known as a panel), please gather the following information:
1. Measurements:
2. Identification Marks
3. Photos
Once you have this information, you can either email it to us or bring it into our office, and one of our sales team members will assist you with pricing and availability.
An overhead door’s R-Value measures its ability to resist heat transfer. The higher the R-Value, the better the insulation—helping keep cold air out in the winter and hot air out in the summer. When it comes to energy efficiency, a higher R-Value is always better.
R-Value is the most widely used standard for measuring a garage door’s energy performance. Both Clopay® and Richards-Wilcox® calculate their R-Values based on the insulation value of the entire door section, in accordance with DASMA (Door and Access Systems Manufacturers Association) guidelines.
Insulated for Superior Performance
The doors we sell are all insulated with polyurethane, a high-efficiency insulation used in both Clopay’s Intellicore® and Richards-Wilcox’s Neufoam™ technology.
Polyurethane insulation is injected as a liquid between the steel layers of the door, expanding to fill every crevice. As it hardens, it bonds to the door’s surface, dramatically improving strength, dent resistance, and overall energy efficiency.
Polyurethane-Insulated Doors offer
Whether you’re using your garage as a workspace, a primary entrance, or simply want better year-round energy efficiency, a high R-Value, polyurethane-insulated door is an excellent investment.
Ask one of our sales professionals for help selecting the right R-Value for your project.
It’s important to remember that your garage door is a movable object and isn’t -possible to create a 100% perfect seal.
This is especially true in windy areas like Grande Prairie, where strong gusts—particularly on west-facing garages or shops—can force air through even the smallest gaps.
While a perfect seal may not always be possible, there are several things you can do to help your door seal as effectively as possible and reduce drafts, moisture, and debris from getting inside.
1. Inspect Your Weatherstrip
2. What measurements do I need for Replacing my damaged weatherstrip?
Inspect the concrete directly beneath your door for:
If there are any issues with the concrete, we recommend contacting a concrete or mudjacking specialist.
4. Is there water pooling towards or under your door?
If the concrete slopes toward your garage, water can seep in under the door—especially during rain or spring melt. In these cases, we recommend installing a concrete trench drain or drainage channel in front of the garage door to help divert water away. A concrete specialist can advise on the best solution for your property.
It’s also important to remember: a garage door is a moving object, and while we can do our best to seal it with quality weatherstripping and adjustments, it will never be 100% watertight.
During heavy rainfall or wind-driven storms, some water intrusion may still occur, especially in garages or shops with poor drainage or wind exposure (such as west-facing buildings in Grande Prairie).
We can help minimize the issue, but there are limits to how much a door can seal in those conditions.
5. Winter Maintenance Tips
Contact our office for technical guidance or to schedule a service call at 780-831-1111.
6. Need Help? Let Us Handle It!
If DIY isn’t your thing, no problem!
CONTACT US or Call our friendly and knowledgeable team 780-831-1111—we’d be happy to schedule a service call or help with troubleshooting to get your door sealing properly:
These instructions apply to residential LiftMaster, Chamberlain, Steel-Craft, or Craftsman brand operators only.
1. Erase the Remote from the Operator’s Memory
This is the most important step. Erasing your operator’s memory will prevent anyone from accessing your garage using the lost or stolen remote.
Important: This will erase all existing remotes from memory. Any additional remotes you still have will need to be reprogrammed afterward.
Watch a how-to video here: How to Erase Codes – YouTube Tutorial
2. Need a new Remote?
Replacement remotes are available at our office.
We stock a wide variety, and all we’ll need to know is the color of the learn button on the back of your opener to match the correct model.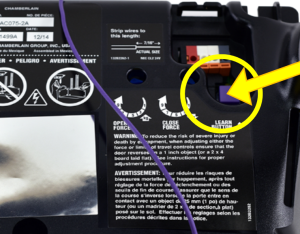
3. Need Help?
If you’re not comfortable doing this yourself, no problem.
CONTACT US or call our office at 780-831-1111, and we can walk you through it, or schedule a service call to have one of our technicians come out, erase the old codes, and program a new remote for you.
These steps also apply to RESIDENTIAL LiftMaster, Chamberlain, Steel-Craft, or Craftsman operators.
1. Locate the Learn Button
Find the learn button on the back of your opener on your ceiling-mounted or inside the box on your sidemount operator (jackshaft)
2. Identify Your Remote Type
Different remotes program in different ways depending on their model.
Use this link to find programming instructions and compatibility info:
LiftMaster Remote Compatibility & Programming Guide
3. Need a New Remote?
We carry a full stock of compatible remotes in-office.
Just let us know the color of the learn button on your operator so we can match the correct remote for your system
4. Still Need Help?
We’re happy to assist! CONTACT US or Call 780-831-1111 for expert technical advice or book a service call if you’d prefer a technician program it for you.
These instructions apply to Residential LiftMaster, Chamberlain, Steel-Craft, or Craftsman garage door openers.
1. Poor Range or Intermittent Signal?
The #1 cause of remote range issues is outside interference—and it’s more common than you might think.
Did you know lightbulbs emit radio frequency interference?
If you’ve recently added or changed any of the following, they may be disrupting your remote signal:
TRY THIS:
Temporarily unplug or turn off the new device or remove the new lightbulb to see if your remote range improves.
Important: Only use approved lightbulbs inside your opener to avoid signal disruption.
Refer to Chamberlain Product Bulletin P2019-19 for the list of 7 approved garage door opener bulbs.
If you’ve ruled out all outside interference, installed an approved lightbulb, and are still experiencing issues, the problem may lie in the logic board inside your operator. In that case, we recommend contacting us for further troubleshooting or to book a service call.
CONTACT US or call 780-831-1111
2. Remote Not Working at All? Try These Steps:
First, try reprogramming your remote.
Instructions here:
HOW DO I PROGRAM MY REMOTE?
If you’re not a do-it-yourself person, no problem!
Contact our team and we’ll be happy to help—or schedule a service call for a technician to come to you and take care of everything:
CONTACT US or call 780-831-1111
These instructions apply to Residential LiftMaster, Chamberlain, Steel-Craft, or Craftsman garage door openers.
If your garage door only closes when you press and hold the wall-mounted pushbutton, the most common cause is an issue with the safety reversing sensors (also called photocell eyes).
Common Causes of Sensor Issues:
Important: Safety sensors are a legal requirement and cannot be removed.
Your garage door will not function unless the sensors are properly installed and aligned.
How to Check and Re-Align Your Safety Sensors:
Test the Door by using your remote control or wall button to close the door.
No Lights on Either Sensor?
If both LED lights are off:
Still Need Help?
If the steps above don’t resolve the issue, or you’re not a do-it-yourself person, we’re here to help.
CONTACT US or call our office at 780-831-1111 for technical support or to book a service call.
Our friendly, knowledgeable staff will assist you with troubleshooting or send a technician to get your door working properly.
NO, your garage door opener will not operate properly without safety sensors.
Why Are Safety Sensors So Important?
Your garage door is the largest movable object in your home or business.
Due to the serious risk of injury or death caused by automatic garage doors in the past, the government implemented the UL325 Safety Standard in 1993.
Under the UL325 Standard, all garage door openers must include:
What Happens if the Safety Sensors Are Blocked or Misaligned?
If the safety sensors detect an obstruction, or if they are bumped out of alignment, the garage door will open normally, but it will not close using the remote.
To close the door in this situation, you’ll need to press and hold the button on the wall station inside your garage until the door fully closes. This is a built-in safety override that disables automatic closing to prevent accidents.
Bottom Line: Tampering with or removing your safety sensors is not only unsafe — it will prevent your garage door from functioning properly and puts you, (as well as, your family and pets) at risk.
We strongly advise keeping them in place and ensuring they always remain clean, aligned, and working correctly.
If you’re experiencing issues with your safety sensors, or if your door won’t close, give us a call and we’ll be happy to help: 780-831-1111 or CONTACT US
Adding glass to an existing garage door is a great way to let in natural light and enhance curb appeal.
However, please note that this is not always possible, especially if your door model has been discontinued or if matching sections and parts are no longer available.
Important Notes:
To determine if this option is feasible and to provide an accurate quote, we’ll need the following information:
To determine compatibility and provide accurate pricing, please provide the following:
Not Sure of these details, or ready to get started?
Sometimes the easiest way to gather all this information is for us to complete a site check.
Call us at 780-831-1111 or CONTACT US; we’ll be happy to walk you through your options and let you know if adding glass is possible—or if a full panel or door replacement might be the better choice.
Yes, you can paint your garage door, however, there are some important things to consider to avoid damaging the finish or voiding your warranty.
Purchasing a Factory-Finish Door is Best
We highly recommend choosing a factory finish color when selecting your door.
A factory-applied finish ensures:
Richards-Wilcox & Clopay both offer a wide range of factory finish color options for every model.
Ask your salesperson for details.
Looking for a Custom Factory Color?
Clopay also offers Color Blast®, a custom paint system available in over 1,500 Sherwin-Williams® colors, with the ability to custom match most paint colors as well.
Learn more about Color Blast® here: Clopay Color Blast® Info
Planning to Paint Your Door Yourself?
If you’re considering painting your garage door, we highly recommend hiring a professional painter to ensure a smooth, even, and long-lasting finish.
For the best results, we strongly advise that the door be painted before installation. This helps prevent the sections from sticking together and gives the paint ample time to cure properly before the door is operated.
If you choose to paint the door, it is critical that you follow the manufacturer’s painting instructions exactly.
Improper preparation or use of the wrong type of paint can cause peeling, poor adhesion, or even lead to warranty cancellation.
Important:
Painting your garage door with some manufacturer’s may void the manufacturer’s warranty all together—this is the case with most door manufacturers.
Have Questions?
If you’re unsure about your color options or how painting might affect your warranty, we’re here to help.
CONTACT US or Call us at 780-831-1111 or speak to your salesperson for personalized advice.
Hear a strange noise or stuck with a door that won’t budge? Contact Northern Doors, your friendly neighbourhood door experts—we’ve got you covered!
We also recommend performing regular maintenance to keep your door(s) operating smoothly. Performing regular maintenance not only decreases costly down time by preventing door malfunctions, it also decreases repair expenses in the long term.
Preventative Maintenance is focused on keeping your doors in peak condition always, instead of only performing maintenance in response to needed repairs.
RECOMMENDED MAINTENANCE SCHEDULE
Important Note: this service is highly recommended but is entirely optional.
The price to complete this service is not included in the price of your door. However, if you choose to proceed with this service within one year of your door being installed, the labour on your first preventative maintenance service will be discounted.
PREVENTATIVE MAINTENANCE INSPECTION & SERVICE CHECKLIST
Important Note: This checklist serves as a general guideline for a preventative maintenance inspection and service. Individual projects may have unique or additional tasks not covered here, such as, servicing dock levelers, gate operators, servicing and completing drop tests on rolling steel doors, or other specialized components and accessories, etc.
Our technicians will assess each situation carefully to ensure all aspects of your equipment receive the appropriate attention and care. Please don’t hesitate to reach out to us if you need more information or have specific service requirements.
🕾 Schedule Your Preventative Maintenance Today
CONTACT US or Call us at 780-831-1111 and ask for service! We’d be happy to answer questions, provide a quotation to complete this service, or get you set up on a maintenance reminder schedule. Plus, you can set intervals of your choosing, or opt out of this reminder or service at any time!
A sectional garage door operates under high spring tension and involves heavy components. Serious injury, property damage, or even death can occur if handled improperly. Please follow these safety precautions:
For professional help or part replacement, CONTACT US or call our office at 780-831-1111 for technical support or to book a service call.
Our friendly, knowledgeable staff will assist you with troubleshooting or send a technician to get your door working properly.
Clean and Preserve Your Garage Door
Routine cleaning and maintenance are essential to protect your garage door from the elements, maintain its appearance, and help prevent long-term damage—especially in areas with high exposure to road salt or other harsh conditions.
How Often Should I Clean My Door?
Benefits of Cleaning and Waxing
Cleaning Your Door
Work from top to bottom, using a well-soaked cloth, soft sponge, or soft-bristle brush with one of the following solutions:
For Painted or Ultra-Grain® Finish Doors:
For Lustra™ Paint Finish Doors:
DO NOT USE:
If you plan to paint your door, refer to the painting instructions before cleaning.
Waxing Your Door (Steel Doors Only)
After cleaning, apply a liquid car wax (not paste) to protect the door’s surface.
Important: Do not wax Lustra™ finish, Wood Doors, or Doors with Cladding or Overlays. These finishes are not intended to be waxed and doing so may damage the surface. Wood doors and Cladded doors have their own separate recommendations.
Questions?
If you’re unsure how to properly clean or maintain your specific door type, we’re here to help.
CONTACT US or call 780-831-1111
At least once a year lubricate all moving parts of the Door Lube or a synthetic lubricant (Do not use WD-40):
❑ Lift cables at bottom bracket button
❑ Full length of torsion spring to reduce friction between coils
❑ Rollers at the bearing (but not the tire)
❑ Hinges
You can purchase a can of high-quality, professional garage door lubricant directly from our office.
We recommend visually inspecting your door once every couple of months while in the fully closed position.
Look for the following signs of wear, damage, or misalignment:
❑ Loose or bent hinges
❑ Broken rollers, bent shafts, or worn-out roller bearings
❑ Loose or missing bolts, screws, or fasteners
❑ Creases or bends in the track
❑ Cracks or fatigue in the door panels
❑ Broken springs or spring hardware (torsion or extension systems)
❑ Worn or frayed cables.
❑ Loose, cracked or warped glass panels or inside glass retainers. Inside the door, the plastic
retainer holding the glass and its fasteners should appear secure.
❑ Tears or gaps in the bottom weatherstrip or side weatherstrip.
❑ Any missing, broken, loose or malfunctioning door handles.
❑ REMOVE any objects touching or leaning against the door or any obstruction that would interfere with
door operation.
❑ Inspect the warning labels.
If anything appears damaged or out of alignment, do not attempt to repair it yourself. CONTACT US or call our office at 780-831-1111 for technical support or to book a service call.
We strive to offer same-day service whenever possible. That being said, it is difficult to provide exact timeframes for service calls because we cannot predict how long each technician’s current service call will take—the only way to guarantee a timeframe is to book the first call of the day.
If you require a more specific arrival window, we recommend scheduling the first appointment of the day, typically between 8:30 AM – 8:45 AM. These time slots are in high demand and tend to fill quickly, so we encourage you to contact our service department early to reserve one.
If you’re available on short notice, this is the quickest way to have your service completed.
For all other bookings, our technician will arrive within a general time window. We appreciate your understanding as we work to serve all our customers efficiently.
Important Note: Emergency calls will always take precedence over general service appointments.
If you have any questions, please don’t hesitate to contact our office.
No, you don’t need to be home.
As long as we have access to your garage, our technicians can complete the work and lock up behind themselves when finished.
You’re welcome to provide us with a door code, or leave a key in a secure location—just let us know the details when booking your appointment.
If you have any special instructions or concerns, we’re happy to accommodate!
Can I book an appointment time for service?
This is difficult to book a specific time frame unless you book the first appointment of the day which is between 8:30-8:45 see more CAN I BOOK A SPECIFIC APPOINTMENT TIME FOR SERVICE?
No, unfortunately, we do not carry residential entry doors in our product lines. We only supply commercial-grade Hollow Metal Man Doors. However, feel free to contact our office—we’d be happy to recommend trusted suppliers of residential entry doors.