WHAT DO I NEED TO MEASURE FOR A NEW DOOR?
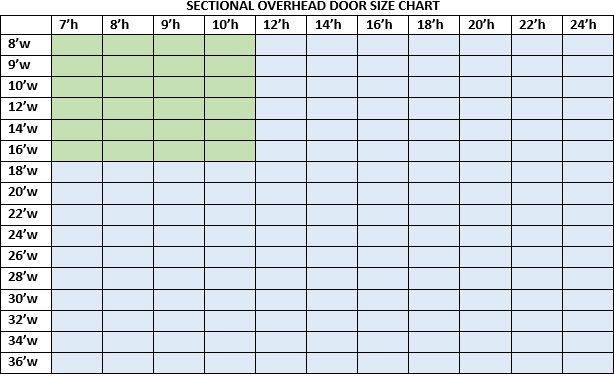
GREEN = GO TO Residential Sectional Garage Door Measurements
BLUE = GO TO Commercial Sectional Overhead Door Measurements
Residential Sectional Garage Door
PERFORM ALL MEASUREMENTS IN FEET & INCHES.
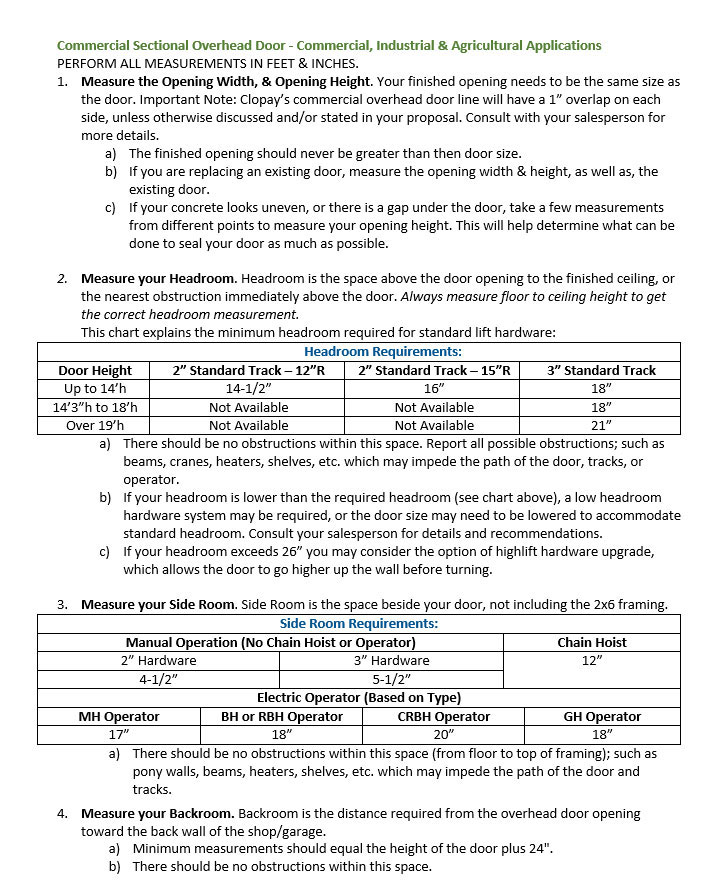
- Measure the Opening Width, & Opening Height. Your finished opening needs to be the same size as the door.
- The finished opening should never be greater than the door size.
- If you are replacing an existing door, measure the opening width & height, as well as, the existing door.
- If your concrete looks uneven, or there is a gap under the door, take a few measurements from different points to measure your opening height. This will help determine what can be done to seal your door as much as possible.
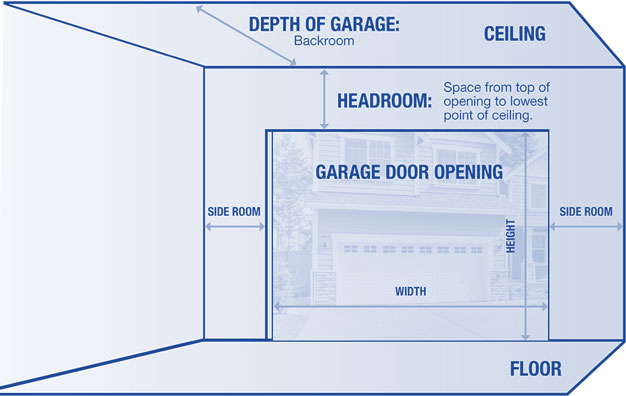
- Measure your Headroom. Headroom is the space above the door opening to the finished ceiling, or the nearest obstruction immediately above the door.
- Always measure floor to ceiling height to get the correct headroom measurement.
- Your minimum headroom requirement is 12” for standard lift. The preferred headroom is 15” above the door.
- There should be no obstructions within this space; such as beams, heaters, shelves, etc. which may impede the path of the door, tracks, or operator.
- If your headroom is lower than 12”, a low headroom hardware system may be required, or the door size may need to be lowered to accommodate standard headroom. Consult your salesperson for details and recommendations.
- If your headroom exceeds 24” you may consider the option of highlift hardware upgrade, which allows the door to go higher up the wall before turning.
- Measure your Side Room. This is the space beside the door opening, not including the 2x6 framing.
- You will need a minimum 4-1/2” of side room on both sides of the door.
- If you are installing a jackshaft (8500W side mount) operator you will need 9” total side room on the desired side you want the operator installed on.
- There should be no obstructions within this space (floor to ceiling); such as pony walls, beams, heaters, shelves, etc. which may impede the path of the door and tracks.
- Measure your Backroom. Backroom is the distance required from the garage door opening toward the back wall of the garage.
- Minimum measurements for manual operation should equal the height of the door plus an additional 18".
- If you plan on installing a chain or belt drive, ceiling mounted operator, the space you will need will be the door height plus an additional 3’ (4’ for 9’high door).
- There should be no obstructions within this space; such as beams, heaters, shelves, etc. which may impede the path of the door, tracks or operator.
- Request a Framing & Wiring diagram, for all other site requirements. Contact Us
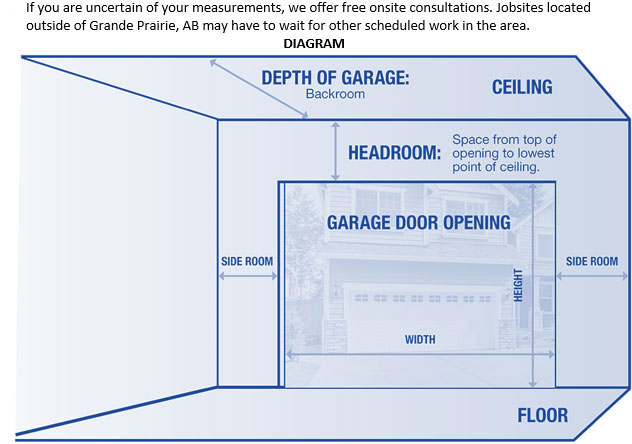
- If you are uncertain of your measurements, we offer free onsite consultations. Jobsites located outside of Grande Prairie, AB may have to wait for other scheduled work in the area.
- Measure the width, height and thickness of the section. Also measure the total width and height of the entire door.
- Look for any markings that may indicate the type of door; such as a sticker or stamp along the edge of the section near the track, or along the top edge of the door, or writing on the track, etc.
- Take both inside and outside pictures of your entire door. This will help us to determine the profile of the door. Please also take pictures of any distinguishing markings, such as stickers, etc. as per #2
- Please send this information via email or bring it into our office and one of our salespeople will help you with pricing and availability.
- Or, If you would like to leave it to us to determine, we offer free onsite consultations. Jobsites located outside of Grande Prairie, AB may have to wait for other scheduled work in the area.
A garage door’s R-value represents its ability to slow the transmission of heat. A higher R-value means a slower transmission of heat, which means less cold air leaking into your garage in the winter and less heat invading your garage in the summer. When it comes to R-values for garage doors, the higher the better!
R-value is the most widely used measurement for a garage door’s energy efficiency. Clopay® uses door section R-value’s for our garage door insulation testing, which is in accordance with the Door and Access Manufacturers Association guidelines. Clopay garage door R-values depend on the door’s thickness, material and insulation, and range from 6.3 to 27.2. Ask your salesperson for details.
The doors we have in stock are insulated with polyurethane. Polyurethane is an energy-efficient material used in Clopay’s proprietary Intellicore® insulation technology. This form of insulation is comprised of a polyurethane foam that is injected in between the door’s steel layers, expanding to fill all of the nooks and crannies of the door. The foam bonds to the door’s frame as it expands, further increasing the strength of the door and making it less susceptible to dents.
Garage doors with polyurethane insulation will provide the highest level of sound isolation and climate control. They are a great choice if you live in very cold or hot climates and your garage door is used as the primary entrance to your home.
- The first step is to erase the memory of your remote on the operator.
This will ensure no one will be able to enter your garage using your remote (instructions can be found below). This will clear all existing codes on your operator. If you have a second transmitter, it will need to be reprogrammed after your have cleared your codes. (see programming instructions)
https://www.youtube.com/watch?v=azYxcCnyrRk&feature=emb_logo
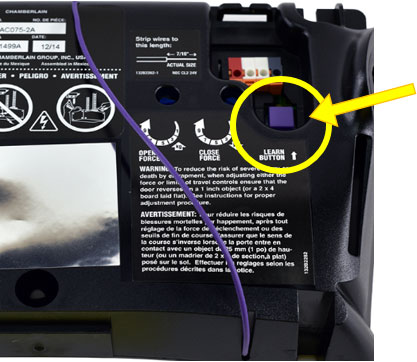
- Replacement remotes can be purchased at our office. We have a variety of remotes in stock. The information you will need to get a new remote will be the color of the learn button on the back of your machine.
- Call our office 780-831-1111 if you need any further technical advice. Or, if you are not a do-it yourself person, we can have a service technician complete a service call and replace and reprogram your remote for you.
These instructions are for residential LiftMaster, Chamberlain, Steel-Craft or Craftsman brand operators only.
RESIDENTIAL
- The first step is to locate the learn button on the back of your opener (this will be located on your ceiling mounted or side mounted operator.
- Next step is to determine the type of remote you have; these instructions include videos on how to program your remotes:
https://support.chamberlaingroup.com/s/article/LiftMaster-Remote-Compatibility
- Call our office if you need any further technical advice. Or, if you are not a do-it yourself person, we can have a service technician complete a service call and replace and reprogram your remote for you 780-831-1111.
- We stock a variety of remotes in our office if you need a new one. We will need to know the color of the learn button to match up the correct remote for you.
These instructions are for residential LiftMaster, Chamberlain, Steel-Craft or Craftsman brand operators only.
- The #1 issue associated with range issues is outside interference.
Did you know that lightbulbs give off a radio frequency? Have you recently installed any new lights inside or outside of your home, including Christmas lights, decorations, or security systems?
If so, try removing the new lightbulb, turning off the new item, or unplugging the new item to test if that is the reason for the loss of range to your remote.
There are 7 approved lightbulbs to use inside your garage door opener. See product bulletin P2019-19 Chamberlain Approved Light Bulbs
If all outside sources are eliminated, the proper lightbulb is installed inside the operator, and the issues are still unresolved; the issue could be with the logic board within the operator itself. In that case we recommend contacting our office for further troubleshooting or to have a service preformed on your door and operator 780-831-1111.
- If your remote is not working:
- First step: try to reprogram the remote. see above instructions: HOW DO I PROGRAM MY REMOTE?
- If that does not work, you can bring your remote into our office and have it tested to see if the remote needs a new battery. We can replace the battery for you.
- If you wish to replace your remote, we stock a variety in our office.
Call our office if you need any further technical advice. Or, if you are not a do-it yourself person, we can have a service technician complete a service call and replace and reprogram your remote for you. 780-831-1111.
These instructions are for residential LiftMaster, Chamberlain, Steel-Craft or Craftsman brand operators only.
If your garage door opener will not close from your remote control, and the opener lights are flashing, verify if your safety reversing sensors are obstructed or out of alignment. If they are obstructed, remove the obstruction and the opener will resume normal operation. If they are out of alignment, indicated by one of the safety sensors LED's being off or flashing, please follow the steps below to realign your safety sensors. Also check that the lens on both safety sensors are clear of dirt and debris.
- Locate both safety reversing sensors. They are located on each side of the garage door, fastened to the door tracks, no higher than 6 inches above the garage floor.
- Loosen the wing nut on the front of the sensor and align the sensors so their lenses are pointing at each other. When the sensor LED glows steadily, tighten the wing nut.
- Once both of the safety reversing sensor LED's are glowing steadily, the garage door opener will resume normal operation.
- Test by using your remote control or door control to close the garage door.
If the above steps do not work, loosen both sensors and realign them and test again. To view a video with these instructions demonstrated see Video - how to align the safety reversing sensors
If these instructions have not helped you, call our office for further technical advice. If you are not a do-it yourself person, contact our office and our friendly and knowledgeable staff would be happy to schedule a service call for you 780-831-1111.
No, your garage door opener will not work without the safety sensors.
Your garage door is the largest, and often the most frequently used door in your home.
Ultimately, due to grave injuries and deaths caused by automatic garage door openers, in 1993 the government mandated UL325 Standard for automatic garage door openers.
To meet UL325 Standards, a garage door opener must have:
- Inherent entrapment protection as primary entrapment protection
- Secondary protection, either external or a secondary inherent protection
- 30 second maximum run timer
When the safety sensors detect an obstruction or are no longer aligned: the garage door opener will open the door but will not close it from the remote controls. The only way to get the garage door opener to close the door is to press and hold the button on the wall station.
The overhead door industry standard recommendations for maintenance are as follows:
Average use Residential Garage Doors & lightly used Commercial, Industrial, & Agricultural Overhead Doors:
5-10 Cycles a day it is recommended a maximum 12 month service schedule.
High Use Commercial, Industrial, & Agricultural Overhead Doors:
Over 10 cycles a day it is recommended a maximum 6 month service schedule.
**Overhead doors located in severe corrosive environments, such as: wash bays, fertilizer, chemical or salt storage, animal barns, composting buildings etc., require additional service to ensure reliability. Consult with your contact at Northern Doors for more information.
Performing regular maintenance not only decreases costly down time by preventing door malfunctions, it also decreases repair expense in the long term.
Preventative Maintenance is focused on keeping your doors in peak condition always, instead of only performing maintenance in response to needed repairs.
Contact our office if you are interested in pricing or scheduling your preventative maintenance inspection 780-831-1111.
A Preventative Maintenance Inspection & Service includes (but is not limited to):
- Inspect the lifting cables & drums. Check the cable anchoring at the bottom roller brackets to determine that the sleeve is tight and that the cable is in good condition. Check the cable through the entire length and ensure that the cable is properly secured at the drum. If the cables have become snagged, bent, or tangled, they should be replaced. The cables could appear to be in good condition; however, internal damage may have occurred and fracture of the cable could follow.
Use extreme care when working with the cables; they are under extreme tension. Only experienced door technicians should attempt to adjust or replace them.
- All of the bearings located throughout the hardware should be checked and lubricated. The rollers on the door, as well as the bearings on the head shaft should be cleaned and lubricated with door lubricant.
- Inspect all of the roller brackets, hinges and the span braces. Tighten any loose fasteners and replace any hinges or roller brackets which are worn or fractured in any way.
- Check the fastening of the track, track brackets and the hanging of the horizontal tracks. Make sure that all track bolts and fasteners are tight and secure.
- Examine the shaft, shaft couplers & torsion springs. The spring function needs to be tested and the set screws tightened.
**WARNING**Springs are under extreme tension. Only experienced door technicians should attempt to adjust or replace them.
- Open and close the door manually without the chain hoist or electric operator (if equipped) to ensure the door is aligned properly and is not restricted anywhere during its open/close cycle.
- Inspecting and testing the electric operator (if equipped) including, force settings, limits, pushbutton station and all other safety systems.
- Inspecting the full perimeter and in-between joint weatherstrip for proper seal, and note if there are any concrete issues.
- Inspect the door sections for damage, rust, and delamination.
- Inspect windows & frames (when present) for cracks, and proper seal.
- Lubricating and tightening all moving parts.
Any worn or damaged components found will be noted on our inspection sheet and a quotation submitted for your consideration. We pride ourselves in the quality of our service technicians and offer a fully stocked parts warehouse.
SAFETY PRECAUTIONS
Periodic maintenance along with the following cautionary directions should be observed to ensure safe and reliable operation.
- Do not operate a garage door if there are obvious grinding or scraping noises.
- Operate the door only when it is properly adjusted and free of obstructions.
- Your door is constantly under extreme spring tension. Repairs and adjustments, especially to cables or the spring assembly, can be hazardous and should be performed by qualified door technicians only.
- Do not leave children unattended in the garage, or permit children to play with garage door or electric controls.
- If the door is now, or is later becoming electrically operated, the pull-down rope and slide lock should be removed to prevent future issues.
- Avoid driving, standing in open doorway or walking through doorway while electrically operated door is moving.
- Should the door become hard to operate or completely inoperative it is recommended that a qualified door technician be contacted. Our friendly and knowledgeable staff would be happy to schedule a service call for you 780-831-1111.
- If your door is equipped with chain hoist or electric operator, it will require special attention to ensure the door is working smoothly and is not binding during its open close cycle.
You should always use professional door lubricant. Never use products like WD-40, or heavy grease type lubricant. We have 15oz cans of National Door brand lube available at our shop for purchase.
It is important to remember that your door is a moving object. Nothing will seal the opening absolutely perfectly, but there are some things you can do to make sure your door will seal, as best as possible:
- Check and make sure that your side, top, in-between joint, and bottom weatherstrip have no
gaps, tears, corrosion, or damage. Replace any damaged, worn or missing weatherstrip.
Top, in-between joint, bottom and side weatherstrip & Stormshield are all available at our office.
What information do I need and what measurements are required to get new weatherstrip?- Side: measure the height of your door.
- Exterior Top: measure the width of your door.
- Interior Top Flap:
- Measure the width of your door.
- Check if your door has a retainer the top flap weatherstrip slides into. Inspect the retainer. If it needs to be replaced you will need to measure the thickness of the door as well.
- In-between joint: Measure the width of your door.
- Bottom: measure the width of your door.
- The bottom of your door should have a retainer. Inspect the retainer. If it needs to be replaced, you will need to measure the thickness of the door as well.
- Check the state of your concrete for heaving, sloping, chipping, corrosion or cracking
immediately underneath the door. If the concrete needs to be fixed, contacta concrete or mudjacking specialist for further advice.
- If you notice any water coming under your door due to the concrete sloping towards your garage door, we highly recommend installing a concrete trench drain in front of your garage door to disperse the water. Contact a concrete specialist for more information.
- Important steps tofollow in the winter:
- Make sure the bottom of your door is free and clear of snow, ice and debris so the bottom weatherstrip does not get ripped and torn. If your door freezes down due to ice build up, it will also cause unnecessary strain on your operator.
- Clear as much snow and ice as possible from your vehicle before pulling into your garage to prevent ice build up inside the garage.
- If you notice humidity and ice buildup on your garage door andwalls, we highly recommend installing a dehumidifier or fan to circulate the air. If thehumidity is not dealt with, mould and corrosion cancause much larger issues.
- If you notice the top of your door is not sealing but your exterior top weatherstrip looks intact, this could be caused by thermal bowing. We recommend not heating your garage door as highly as you heat your home. Your door or operator may need a few adjustments to make it seal better, or it may be recommended to add a top flap style weatherstrip on the inside of the door top allow it to seal better. Contact our office for technical advice or to book a service call 780-831-1111.
- If you are not a do-it yourself person, contact our office our friendly and knowledgeable staff would be happy to schedule a service call for you 780-831-1111.
Yes, you can paint your door, but we highly recommend going with a factory finish color.
A factory finish paint will ensure color fastness, no chipping or peeling. Clopay has a wide variety of factory finish colors available in every door model. Ask your salesperson for details.
There is also an option to have your door Color Blast® custom factory painted. Color Blast® is available in 1,500 Sherwin-Williams® colors. In addition to the large array of Sherwin-Williams® colors available, Clopay can custom match most paint colors. See below link for more information https://www.clopaydoor.com/residential/buyingguide/colorblast
For painting instructions visit https://clopaypdfs.com/pdf_files/INST-PAINTLRV-16_EN.pdf failure to follow these instructions will void the warranty on your door.
REQUEST A RESIDENTIAL OR COMMERCIAL WIRING &, OR FRAMING DIAGRAM
![]()
CONTACT INFORMATION
-
ADDRESS:
8702-111A Street
Grande Prairie, AB T8V 5L3
Phone: 780-831-1111
Fax: 780-831-1112
Email Us


HOURS OF OPERATION
OFFICE HOURS:
Monday to Friday
8:00 am – 5:00 pm
Closed All Statutory Holidays
SERVICE HOURS OF OPERATION:
24 Hours a day
365 Days a Year!
Serving the Peace Region